Using a server for Dynamic Web Design
Edinburgh Domains
For this course, it’s necessary to have access to a web server on which you can build your own web site using arbitrary tools. For this purpose, we are using “Edinburgh Domains”, a service licensed to the University that provides each user with their own individual web server, and an associated domain name.
This is made available through the University’s EASE login system: to register for it you should go to https://edinburgh.domains and click on the link at the top that says “Login”, then on the next page “Get Started”.
On this server, you are very much in control – you can install software, change configurations, and many other things. It provides for using the PHP language to process server scripts, and it provides a MySQL database system, which we’ll be using for the projects in this course.
This is actually a custom version of a commercial service called “Domain of One’s Own” (DoOO) – you’ll find that some of the instructional material (videos) on this course were made with the commercial service, but the differences are minimal. Most web service providers, in fact, use tools and systems that are very similar to these, so skills that you learn with this arrangement will be highly transferable to other situations.
Once you’re into the Edinburgh Domains system, make sure that you’re looking at the “Dashboard”. This has a new interface theme called “Jupiter”, which you might see a message about; the dashboard may look a bit different from the one in the course videos, but it still works in the same way. There are some error warnings that appear, which come from code we have no conrtol over and can safely be ignored.
Here, you’ll find links to an impressive array of tools that you can use to do all kinds of things. Specifically, we’ll need to set up a database and make sure that we can connect to the server using a protocol called SFTP. This is almost all that we’ll need to do here – most work with the server subsequently will be done by simply using the database through PHP.
The generic picture of the situation is like this:
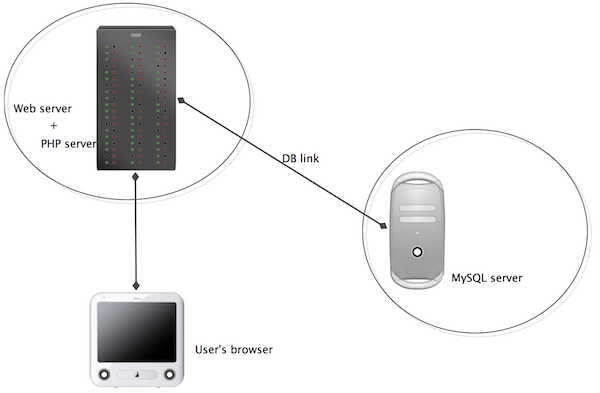
The “Edinburgh Domains server” is actually a host that hosts the MySQL server as well as the web and PHP servers, so when you make a connection from PHP code you can connect to MySQL by specifying “localhost”, which means the same host as the PHP server. However, if you want to connect to it from code (or a client) on a different host, such as your own machine, you will need to provide the appropriate host name for your Edinburgh Domains MySQL server.
To access the Edinburgh Domains server, one option is work throught its own online Dashboard, which provides a file manager to manage the files you store on it, as well as management tools for the database server, etc. However, this is quite inconvenient and often we will want a more direct form of connection, which is done through a method called SFTP (secure file transfer protocol). There are many SFTP clients available, such as Cyberduck. You can use any of these. But also, you can make SFTP connections directly within PHPStorm, which allows you to manage the connection and your project code in a very integrated way.
Before you can access your Edinburgh Domain through SFTP, you have to configure it. In the Dashboard, you’ll see at the very top of the screen, not actually on the dashboard but above the Edinburgh logo, a link that says “Manage your Account”. On the drop-down menu under this, choose “User Information”. Then you have the option to create an FTP password. It also tells you your username, hostname and port – these are the crucial details, along with the password, that any SFTP client (or PHPStorm) will need. Create a password, and keep a note of it (though you can create a new one without it, if it gets lost). Then follow instructions for connecting with your chosen SFTP client, or (as in the introductory video) from inside PHPStorm.
Once you have connected, you should find that you can see the folders and files in your home folder (or home directory in the more traditional language I may use from time to time). Do not delete anything in here without understanding what it is and why you don’t need it! Many of these files may be quite important. Similarly, it’s best not to put files into most of the folders that you can see. You should see a folder called public_html – this is the folder that provides the web root of your web site: anything in this folder is visible on the web, with a URL that starts with “<your_domain>.edinburgh.domains”. Nothing outside this folder is visible on the web at all. (For this reason, we’ll later create a folder called AboveWebRoot that is outside this folder and hence not visible on the web.) Note that “public_html” does not appear in any URL.
Please note that URLs to your server are visible to the world, so be aware of this and consider issues of copyright and suitability when placing material on this server. When using this hosting service, you are still bound by the University of Edinburgh Computing Regulations, as well as normal laws and conventions.
It will be useful to set your client (or PHPStorm, or the Edinburgh Domains file manager) so that it shows “hidden files”. These are files that start with “.” and which you normally can’t see. You may see quite a few of them, which can mostly be ignored, but later (to use the Fat Free Framework) we’ll need to use one called “.htaccess”.
Using MySQL
MySQL is a powerful database system traditionally used via a UNIX command-line, entirely by writing SQL commands. This is hugely flexible, but not very attractive. Luckily there are many neat, often freeware, clients with graphical interfaces that will generate the SQL commands for you. MySQL is also server-based, which means that for our purposes we will always be using databases provided by the MySQL server running on your own Edinburgh Domain host. The Dashboard provides for administration of the database using PHPMyAdmin, which is a client written in PHP; it’s a little little clunky, but effective. With this, you can create tables, edit the contents, etc. But first, you need to create a database. You do this using the “MySQL Database Wizard” on the Dashboard. It’s pretty self-explanatory. Create a database, and a user, and give the user “All Privileges” when prompted. Note what you have called the database and the user, and the password you will have had to create for the user: you’ll need these to connect to the database from PHP or a client. When you go into PHPMyAdmin on your host, you’ll see that it shows the database you’ve created (you could create more than one, but for our purposes one is enough), and then you can select it and create tables. For the Simple Example you should create a table called simpleModel. See notes, videos etc.
You will have full privileges to create, change and delete tables in your database. Be careful with this! If you change or delete something, there is NO WAY OF UNDOING IT! (If you are considering a major change to a table that might be important, ALWAYS make a duplicate or backup copy of it first, just in case. You can easily duplicate a table in PHPMyAdmin; or you can export a table, or your whole database, as a file that you can save as a backup.)
You can create new tables, as you wish. When you’ve created a table, you have to add specifications of fields (columns) one at a time, in the “Structure” view. You can then change to the “Browse” view and add and view the table rows.
You can also define keys and relationships between the tables, although for a simple web application this is usually not necessary. Consult any text on SQL for further information. There is also (extremely extensive) online MySQL documentation.
We assume that for our purposes here, we will mostly only need to create tables and specify the types for all the fields. That is, we will only need to create the Structure of the database. Then content will normally be added and manipulated via PHP. If necessary, however, it is also possible to import data from files, even e.g. data files exported from other databases or spreadsheets created in Excel etc.
Notice that MySQL data fields can contain all kinds of things, including image data; but usually we will want to keep images as files on a web server, and simply include the URL in the database. So all our data is noramlly either text/strings or numbers.
Accessing MySQL from PHP
We will be doing this using the Fat Free Framework. See the lecture notes for details. Do NOT use the older and seemingly simpler MySQL extension, or even MySQLi, as used e.g. by w3schools. PHP is extremely vulnerable to attacks and exploits by all kinds of hackers: be afraid, be very afraid! Do not use code of unknown quality acquired from random sources. There are many sources of good, tested and reliable PHP code: always use these.
Consequences of hacking
The consequences of people hacking a PHP server can be severe. It can be crashed, have databases destroyed, be used to attack and seriously damage other servers, or to send torrents of junk email. Your Edinburgh Domains server is fairly insulated from other systems and will cause problems mostly just for you and your fellow students if it is damaged; but that’s bad enough! If things go really seriously wrong, it may have to be shut down by the providers. In this situation, most likely, everything on the server will be lost and you will simply have an empty one: therefore, always make sure that you have a copy of your work somewhere else. If you follow the recommended process of mirroring your site from a local machine using PHPStorm, then most of your recovery is a simple matter of uploading the site again, but note that you will have lost any database data, so if any of this is important it should also be copied elsewhere. We expect that there will be genuine accidents, and we’re prepared for them; but there is no excuse for just being careless.